WordPress & jQuery Contact Form without a Plugin
There are lots of WordPress plugins for contact forms, but wouldn’t it be nice to have more control over the markup? In this tutorial, I am going to show how to use a custom page template to create a contact form in WordPress without a plugin.
Some people may want to skip the post and get to the demo and source files:
View Demo Download Source Files
So, why not use a plugin?
Well, I think that a contact form is so simple that a WordPress plugin that doesn’t provide exactly what I want is pretty lame. Plus, I don’t need all those fancy interfaces for building the form; I just need the code.
The Plan
Our plan is to create a custom WordPress Page Template, then create a page that uses that template. Finally, we will add in a little jQuery to improve the form. Let’s write a little pseudo code to help determine how our page template will be structured.
Pseudo Code
Creating the WordPress Page Template
Alright, so first, we are going to start with some basic stuff: define the template name, include the header/sidebar/footer, and setup the basic structure of our pseudo code.
The Form
Next, let’s code the actual form. I also want to provide the ability for the user to enter some text to go above the form, so we are going to use the regular loop:
If the emailSent variable is set to true, we display the thank you message. Otherwise, we show the form. So we are outputting the title of the page, and any content that was entered. Then, we are checking to see if there was an error. Finally, we display the form:
Note: Line wrapping added for readability.
Ok, wow, that may seem like a lot. So let’s break down the name field to see what this code is actually doing:
We are displaying each form field in a list item, displaying the label, input field, and then showing an error message if there is one. We are also displaying the value in the form field if it was already submitted.
So in essence, we are just doing that for each field of the form. You could easily go into the code to add more fields.
We are also using honeypot captcha to see if a bot was trying to submit the form:
That list item is pushed off the page with CSS, and if there is a value in that field, we can assume that it is not a human trying to submit the form:
The Validation
Next, we are going to have a conditional statement to determine if the form was submitted or not:
Within that conditional, is where we are going to do all of our validation of the required fields. First, let’s check to see if our honeypot captcha form field is filled in. If it is, then we will display an error and not check anymore of the form:
So if the captcha field was left blank, we will continue to validate the required fields:
Again, that may seem like a little much, so let’s just take a look at the validation on the name field:
If the name field if empty, set a variable that will display the name error and set a flag saying that there was an error on the form. Otherwise, set a variable that will contain the name value from the form.
Sending the Email
Now, we want to send the email if there are no errors:
Note: Items bolded are values that you will want to change before implementing.
I personally like to have the contact form submission come from myself. That way, I just setup a filter in Gmail, and I can guarantee that it won’t get caught in my spam filter. The second email is only sent if the user checks the checkbox to send a copy to themselves.
View Entire Custom Page Template
Creating the Page in WordPress
First, you want to upload the contact-form.php page template to your themes folder. Next, you will create the page in WordPress and select Contact Form as the page template.
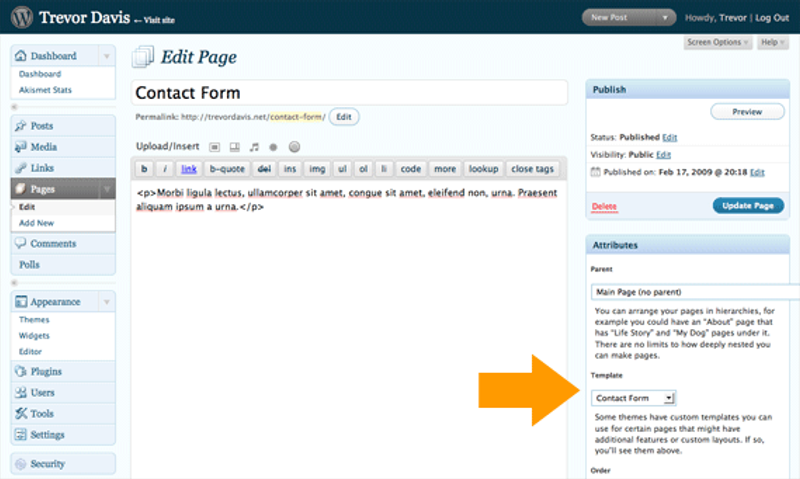
Then, just publish your page and you will have your contact form. Well, the form will be usable, but we are going to add in some CSS and jQuery to finish it off.
Styling the Form
I recently wrote an article about styling forms, so we are just going to stick with some basic styles:
So drop that CSS in your theme stylesheet and you will see the form start to look much better.
Enhancing the form with some jQuery
I have also already written about creating AJAX forms with jQuery, but I thought I would specifically talk about an AJAX script for a contact form.
First, we want to execute our jQuery when the document is ready and the form was submitted:
Next, we want to hide any error messages if there are any and validate any required fields which are denoted with a class of requiredField:
After that, we want to validate that the field is not empty and append an error message if it is:
If the field is not empty and also has a class of email, we want to validate that the email address is valid:
If there are no errors, then we want to replace the submit button with a loading image:
Note: You will need to update the source of the image to wherever you upload it in your theme.
Finally, let’s submit the form via an AJAX request, slide the form up, and show a thank you message:
Take a look at the entire script:
Just include it in the head of your document after jQuery, and you are good to go:
Note: You may need to change the source depending upon where you upload the files in your theme.
Conclusion
View Demo Download Source Files
That’s it! Just upload the files and you’ve got your form. Since you’ve got the code right in front of you, it should be very easy to tweak and add on to. Enjoy!
CenturyLink Deals: Internet, Phone, & TV Bundles